

Most adult craft programming fails for a pretty straightforward reason: it was designed for kids and then scaled up. You end up with a table of pony beads, a crowd of 40-year-olds who look slightly embarrassed, and a facilitator who runs out of things to say after eight minutes. Adults don't want busywork. They want something they can take home, sit comfortably next to a glass of wine, or post a picture of.
This is a working playbook of 12 workshops built specifically for overnight camps, retreats, and adult-evening programs. Every one includes the operational details that usually get skipped — real unit costs, staffing ratios, cleanup SOPs, and adaptation notes. At the end you'll find procurement templates and a printable materials sign-off sheet you can hand to whoever runs your camp store.
These are organized by mess level and skill floor, because those two variables predict about 80% of whether a session runs smoothly.
How to read each plan
Every workshop below follows the same one-page structure so your staff can pull, prep, and run without guessing:
-
Objective — what participants walk away with
-
Audience & group size — who it fits, how many
-
Materials + unit cost — priced per participant
-
Prep checklist — what to do the day before
-
Set-up diagram — table/station layout in plain text
-
Session length — realistic, including the slow starters
-
Staffing ratio & roles — lead vs. floater
-
Steps — the actual run-of-show
-
Accessibility & adaptation notes
-
Alcohol-friendly modifications — because a lot of adult-evening programming pairs with a bar
-
Cleanup & storage SOP
-
Marketing blurb — two sentences for your schedule
Here's a quick visual of the common prep → run → cleanup workflow so you can train staff faster and ensure nothing gets missed during handoff.
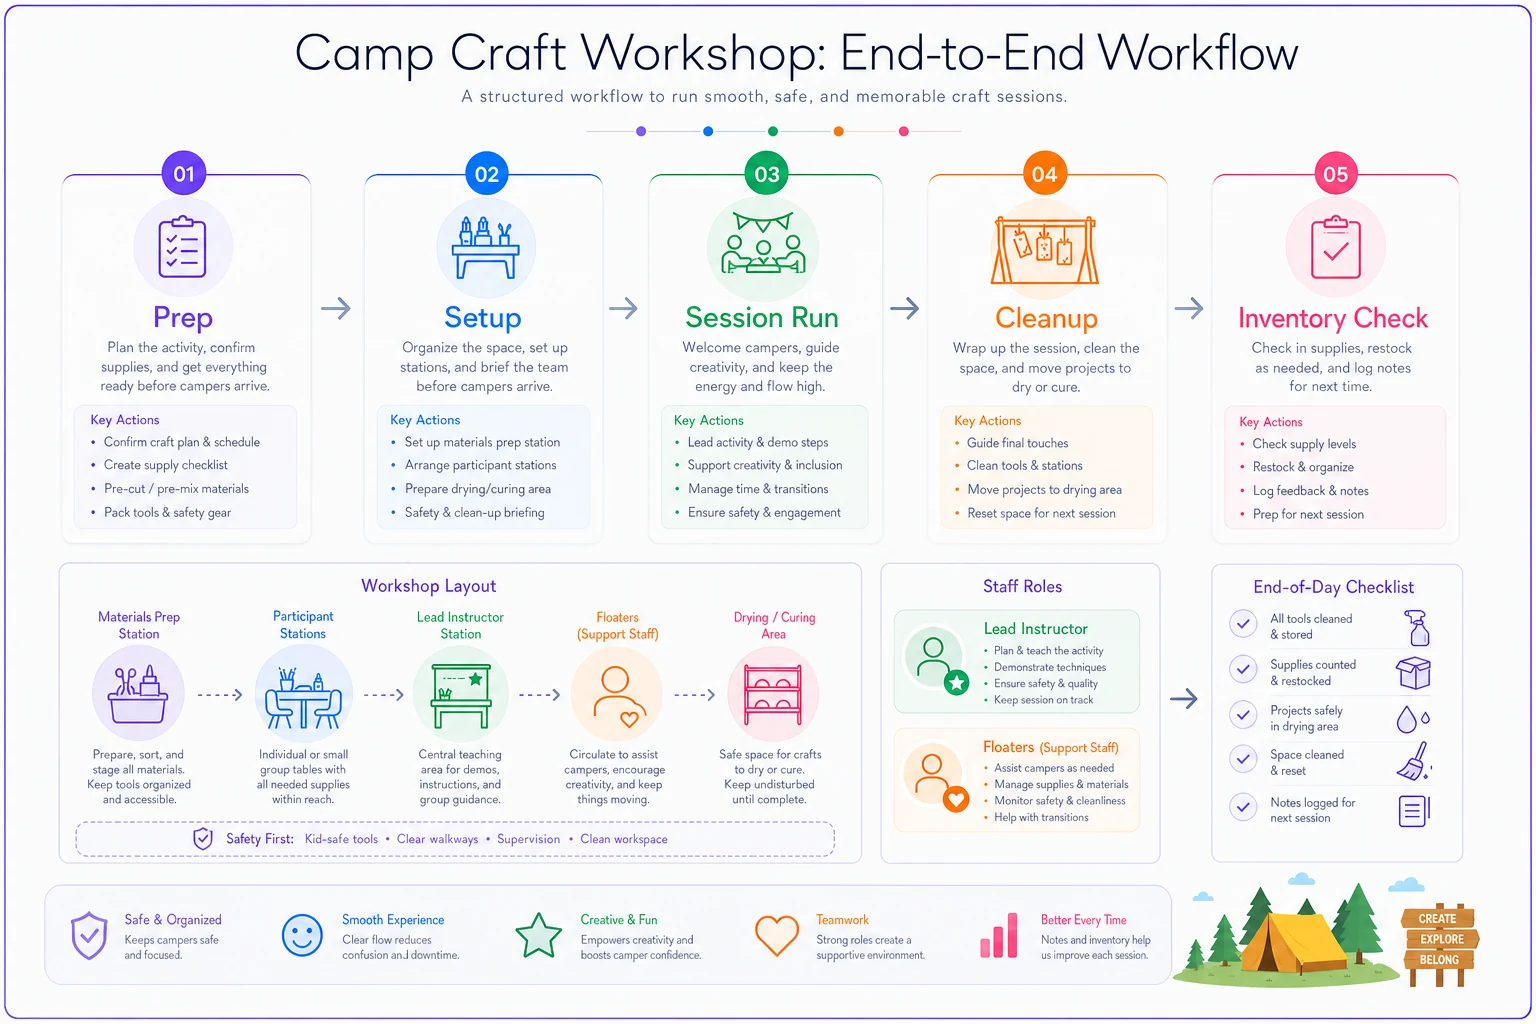
Use this simple checklist image as a training aid so new staff can follow the sequence during their first few sessions.
Pack individual material kits the day before to shave setup time and reduce mid-session confusion.
A quick note on the alcohol-friendly line items: this doesn't mean encouraging drinking. It means designing the craft so that a participant who's had a glass or two of wine at a retreat social can't seriously injure themselves or ruin the materials. That usually means no exposed blades, no hot elements above chest height, and steps that survive being done slightly out of order.
The 12 workshops at a glance
Costs assume bulk purchasing for a group of 20 and exclude reusable tools, which you amortize across seasons.
Simplify camp operations with centralized control.
Campyly empowers you to manage registrations, staff, and activities seamlessly—all from one platform.
- Integrated camper and staff management
- Automated notifications and alerts
- Dynamic scheduling and resource allocation
No credit card required
| # | Workshop | Mess level | Skill floor | Cost/person | Session length | Alcohol-friendly? |
|---|---|---|---|---|---|---|
| 1 | Leather key fobs & luggage tags | Low | Beginner | ~$4.50 | 60 min | Yes |
| 2 | Pour-painting on wood rounds | High | Beginner | ~$6 | 75 min | Yes (with smocks) |
| 3 | Candle pouring (soy container) | Medium | Beginner | ~$5.50 | 60–75 min | Caution — hot wax |
| 4 | Block-printed tea towels | Medium | Beginner | ~$5 | 75 min | Yes |
| 5 | Macramé plant hangers | Low | Intermediate | ~$4 | 90 min | Yes |
| 6 | Campfire enamel mug etching | Low | Beginner | ~$7 | 45 min | Yes |
| 7 | Pressed-flower resin coasters | Medium | Intermediate | ~$8 | 90 min (+cure) | Caution — resin |
| 8 | Hand-stamped metal jewelry | Medium | Beginner | ~$6.50 | 60 min | Yes |
| 9 | Watercolor + ink field journals | Low | Beginner | ~$5 | 75 min | Yes |
| 10 | Whittled walking-stick handles | High | Advanced | ~$3 | 90 min | No — blades |
| 11 | Herb salt & infused-oil jars | Medium | Beginner | ~$5.50 | 45 min | Yes |
| 12 | Group mural on reclaimed wood | High | Beginner | ~$4/person | 2 hrs | Yes |
More on that in the budget section.
The workshop plans
This section contains the one-page workshop plans for each craft, including materials, staffing, steps, and cleanup SOPs.
Use each plan as written or adapt it to your schedule and staffing constraints; the operational details are the part most sites skip.
1. Leather key fobs & luggage tags
Objective: Each participant leaves with a usable, hand-stamped leather item.
Audience & size: All skill levels; 8–24 people.
Materials + unit cost:
-
Pre-cut veg-tan leather blanks — ~$1.80 ea
-
Rivets + snap sets — ~$0.60 ea
-
Keyring hardware — ~$0.40 ea
-
Shared
leather stamps, mallets, poly cutting mats, edge dye
Prep checklist: Punch rivet holes the day before — this is the step that eats time during live sessions. Lay out one mallet per two people. Pre-dye edges if you want a finished look without adding 20 minutes to the runtime.
Set-up diagram: [ Stamp station ] [ Rivet/press station ] long table long table \ / [ Finishing / keyring table ] Keep stamping and riveting separate. Mallet noise clusters at the stamp table and people naturally rotate without being told to.
Session length: 60 minutes.
Staffing: 1 lead + 1 floater per 12. Lead demos stamping; floater manages the rivet press, which is where people consistently get stuck.
Steps:
-
Demo stamping on a scrap piece.
-
Participants stamp their design (5 min limit or they'll agonize over every letter).
-
Add edge dye, let sit 2 minutes.
-
Attach keyring hardware and set rivet.
-
Buff and done.
Accessibility: Rivet setting needs hand strength — keep a hand press (not just a mallet) available for anyone with grip limitations. Pre-punched holes remove the hardest fine-motor step.
Alcohol-friendly: Fully compatible. Mallets are the only real "risk" and they're low-stakes.
Cleanup & storage SOP: Wipe dye off mats immediately — it stains once dry and becomes permanent. Count and lock stamps back into their foam case; these walk off more than any other tool in a craft room. Store leather flat in a bin with silica packs.
Marketing blurb: Stamp and rivet your own leather key fob or luggage tag to take home. No experience needed — just pick your initials and swing a mallet.
2. Pour-painting on wood rounds
Objective: A finished abstract art piece using acrylic pour technique.
Audience & size: Great for evening socials; 8–20.
Materials + unit cost:
-
Wood round (5–7") — ~$2.50 ea
-
Pouring acrylics (pre-mixed) — ~$2 ea per person portion
-
Cups, stir sticks, gloves — ~$0.75
-
Shared
pouring medium, silicone oil, drip trays, torch (staff only)
Prep checklist: Pre-mix paint-to-medium ratios into labeled squeeze bottles the day before. This is the single biggest time-saver and eliminates the most error-prone step in the session. Cover every surface with plastic sheeting — more than you think you need.
Set-up diagram: [ Pour station w/ drip trays ] x4 (2 people per station) [ Drying rack / staff torch zone ] <- staff only
Session length: 75 minutes, but the piece dries for 24–48 hours, so plan pickup logistics in advance.
Staffing: 1 lead + 1 floater per 10. Only staff use the torch (it pops air bubbles) — never hand it to participants.
Steps:
-
Layer paints into a cup without stirring.
-
Flip cup onto wood round, lift, and tilt to spread.
-
Staff torches the surface briefly.
-
Move to drying rack with a name tag underneath.
Accessibility: Fully seated-friendly. For low-vision participants, high-contrast paint sets give more satisfying results.
Alcohol-friendly: Yes, with smocks. One of the more popular wine-and-craft pairings because it's forgiving and looks impressive regardless of skill level.
Cleanup & storage SOP: Dried acrylic peels off plastic sheeting in one sheet — roll and toss. Silicone oil makes floors dangerously slick; mop the pour zone before anyone walks through it. Leftover mixed paint keeps for about a week, no longer.
Marketing blurb: Pour, tilt, and watch acrylic paint bloom into art on a natural wood round. Zero skill required — everyone's turns out beautiful.
3. Candle pouring (soy container candles)
Objective: A scented soy candle in a reusable vessel.
Audience & size: 8–20.
Materials + unit cost:
-
Soy wax flakes (~4 oz/candle) — ~$1.20
-
Wicks + stickers — ~$0.35
-
Fragrance oil portion — ~$1
-
Glass vessel — ~$2.50
-
Shared
pouring pitchers, thermometers, warming plates
Prep checklist: Pre-weigh wax into portioned bags. Test one candle from your batch a day early — fragrance load and wick size vary by wax lot and you don't want to discover that during a live session.
Session length: 60–75 min (wax needs to reach temp, then cool).
Staffing: 1 lead + 1 floater per 10. The floater owns the melting station throughout.
Steps:
-
Center and stick the wick.
-
Melt wax to ~185°F, remove from heat.
-
Add fragrance at ~135°F, stir 2 minutes.
-
Pour into vessel, secure wick with a clothespin bridge.
-
Cool undisturbed for 20+ minutes.
Accessibility: Seated-friendly. Pre-warmed wax stations reduce standing at the melter.
Alcohol-friendly: Caution. Hot wax and melting plates are a real burn risk. If alcohol is being served, have staff do all pouring and let participants handle only wick placement and fragrance selection.
Cleanup & storage SOP: Wipe pitchers while wax is still warm — cold wax is a nightmare to remove. Store fragrance oils sealed and away from heat. Unplug and log all warming plates at session end.
Marketing blurb: Choose your scent and pour a soy candle in a keepsake jar. Part chemistry, part aromatherapy, entirely relaxing.
4. Block-printed tea towels
Objective: A hand block-printed cotton tea towel or tote.
Audience & size: 10–24.
Materials + unit cost:
-
Cotton flour-sack towel — ~$1.75
-
Fabric ink portion — ~$0.75
-
Foam or rubber blocks — reusable
-
Brayers, trays — reusable
Prep checklist: Iron towels flat and tape them to boards before the session starts. Pre-cut a set of blocks in simple shapes if you don't want a carving component — adding carving increases both risk and time considerably.
Session length: 75 min.
Staffing: 1 lead + 1 floater per 12.
Steps:
-
Roll ink onto block with brayer.
-
Press firmly onto taped-down fabric.
-
Repeat the pattern.
-
Heat-set with an iron (staff handles the iron).
Accessibility: Fully seated. Larger blocks with handles help anyone with grip challenges.
Alcohol-friendly: Yes — as long as staff run the iron for heat-setting.
Cleanup & storage SOP: Wash brayers and trays immediately; dried fabric ink ruins them permanently. Air-dry blocks flat. Keep an inventory of blocks — well-carved ones are worth reusing for years and worth protecting.
Marketing blurb: Ink up hand-carved blocks and print your own patterned tea towel. Simple, satisfying, and genuinely useful in your kitchen.
5. Macramé plant hangers
Objective: A finished macramé hanger using 3–4 knots.
Audience & size: 8–16 (rope-intensive to demo at larger sizes).
Materials + unit cost:
-
Cotton cord (~30 ft) — ~$3
-
Wooden ring — ~$0.50
-
Shared
scissors, tape, S-hooks or a hanging rack
Prep checklist: Pre-cut cord to length and bundle per person before the session — measuring live eats 15 minutes you don't have. Set up a hanging rack; macramé is nearly impossible to teach laid flat on a table.
Session length: 90 min. This one runs long for beginners without exception.
Staffing: 1 lead + 2 floaters per 12. Knot help is constant and hands-on — don't understaff this one.
Steps:
-
Mount cords on ring with lark's head knots.
-
Group and tie square knots.
-
Add spiral or gathering knots.
-
Finish with a wrap knot.
Accessibility: Requires sustained fine motor use and some overhead work. Offer a tabletop clamp stand so no one has to hold their arms elevated. Larger-diameter cord is easier on the hands for extended sessions.
Alcohol-friendly: Yes. Only tool is scissors.
Cleanup & storage SOP: Wind leftover cord to prevent tangles — loose cord sitting in a bin becomes unusable faster than anything else in your inventory. Count and store scissors.
Marketing blurb: Learn a handful of classic knots and leave with a plant hanger worthy of your favorite window. Relaxing, repetitive, and surprisingly meditative.
6. Campfire enamel mug etching
Objective: A personalized etched enamel or steel camp mug.
Audience & size: 10–30 — fast and high-throughput.
Materials + unit cost:
-
Enamel mug — ~$5.50
-
Vinyl stencils + etching cream OR electro-etch pens — ~$1.50
-
Gloves — ~$0.25
Prep checklist: If using etching cream, set up a rinse station with running water nearby — this is non-negotiable. Pre-cut common stencils (initials, camp logo, simple icons) to keep things moving.
Session length: 45 min — the shortest on this list. Works well as a filler between longer sessions.
Staffing: 1 lead + 1 floater per 15.
Steps:
-
Apply stencil to mug.
-
Brush on etching cream with gloves on.
-
Wait the specified time.
-
Rinse thoroughly and peel stencil.
Accessibility: Seated-friendly. Electro-etch pens are easier than cream for anyone sensitive to chemical handling.
Alcohol-friendly: Yes. If using etching cream, staff should apply and rinse — it's a mild acid and worth keeping in trained hands.
Cleanup & storage SOP: Neutralize and dispose of etching cream per manufacturer instructions. Store cream sealed and labeled with purchase date. Gloves are single-use.
Marketing blurb: Etch your initials or the camp crest into a rugged enamel mug you'll actually use around the fire. Quick, personal, and yours to keep.
7. Pressed-flower resin coasters
Objective: A set of two resin coasters with pressed flowers.
Audience & size: 8–16.
Materials + unit cost:
-
Silicone coaster molds — reusable
-
Epoxy resin portion — ~$4
-
Pressed flowers — ~$1 (or free if you press your own ahead of season)
-
Gloves, stir sticks, cups — ~$1
Prep checklist: Press flowers 1–2 weeks ahead or buy pre-pressed. Pre-measure resin components. Ventilate the room well — resin fumes accumulate faster than people expect in enclosed spaces.
Session length: 90 min of active work, then a 24-hour cure. Plan a pickup window the following day.
Staffing: 1 lead + 1 floater per 8. Resin mixing ratios are exact and error-prone; the floater double-checks measurements before anyone pours.
Steps:
-
Arrange flowers face-down in mold.
-
Mix resin precisely 1
1 (or per product specs), stirring slowly to avoid bubbles.
-
Pour a thin base layer.
-
Adjust flowers, then top off.
-
Torch bubbles (staff only), cover, cure.
Accessibility: Fully seated. Requires steady pouring — offer pre-mixed resin for anyone with tremor or grip issues.
Alcohol-friendly: Caution. Resin requires accurate measuring and clean handling. If alcohol is being served, staff should mix all resin and hand participants ready-to-pour cups only.
Cleanup & storage SOP: Resin is unforgiving once cured — line the entire table, not just the immediate work area. Uncured resin is a skin and disposal hazard; follow local disposal rules and never pour down drains. Cured drips peel cleanly off silicone mats, which you can reuse indefinitely.
Marketing blurb: Preserve real pressed flowers in glossy resin coasters you'll keep for years. A little patience, a lot of payoff.
8. Hand-stamped metal jewelry
Objective: A stamped aluminum or brass pendant or bracelet.
Audience & size: 8–20.
Materials + unit cost:
-
Metal blanks — ~$1.50
-
Jump rings + chain/cord — ~$1
-
Shared
metal stamps, steel bench block, mallets
Prep checklist: Tape stamp guides onto blocks so letters line up consistently. This one detail separates crooked results from pieces people are actually proud of.
Session length: 60 min.
Staffing: 1 lead + 1 floater per 10.
Steps:
-
Position blank on steel block.
-
Line up stamp, strike once firmly (not repeatedly — multiple strikes blur the impression).
-
Darken impressions with a marker, wipe excess.
-
Attach jump ring and chain.
Accessibility: Striking needs some force. Keep a bench vise or stabilized block available for anyone who can't hold and strike simultaneously.
Alcohol-friendly: Yes.
Cleanup & storage SOP: Metal stamps rust — wipe and store dry alongside the leather stamps. Sweep for dropped jump rings; they vanish into floorboards and slowly drain your inventory.
Marketing blurb: Stamp a word, date, or set of coordinates into a metal pendant that means something to you. Hands-on and heartfelt.
9. Watercolor + ink field journals
Objective: A bound field journal with a hand-painted cover.
Audience & size: 10–24 — low mess, easy to scale.
Materials + unit cost:
-
Blank journal or bookbinding kit — ~$3
-
Watercolor set portion + brushes — ~$1.50
-
Waterproof ink pens — ~$0.50
Prep checklist: Pre-cut cover paper if binding from scratch. Set out one water cup per two people — sharing works fine here.
Session length: 75 min.
Staffing: 1 lead + 1 floater per 15. One of the lightest staffing loads on this list.
Steps:
-
Sketch a simple cover design in pencil.
-
Ink the lines.
-
Add watercolor washes.
-
Bind or assemble the journal.
Accessibility: Very inclusive. Larger brushes and grip-friendly pens help. No physical strength required at any step.
Alcohol-friendly: Yes — probably the most relaxed pairing on this list.
Cleanup & storage SOP: Rinse brushes, reshape tips, store bristle-up. Cap markers immediately — an open waterproof pen is a dead pen within an hour. Store paper flat and dry.
Marketing blurb: Paint and bind your own pocket field journal to carry on every trail. Loose, forgiving, and perfect for total beginners.
10. Whittled walking-stick handles
Objective: A carved grip or decorative detail on a walking stick.
Audience & size: 6–12 max — needs close supervision throughout.
Materials + unit cost:
-
Basswood or found stick — ~$1
-
Cut-resistant gloves — reusable
-
Shared
carving knives, sharpening supplies
Prep checklist: Sharpen and count every knife before the session starts. Brief the entire group on the safety triangle (no one within arm's reach of a moving blade) before a single knife comes out.
Session length: 90 min.
Staffing: 1 lead + 1 floater per 6. The tightest ratio on this list, and it's that way for a reason.
Steps:
-
Safety demo and glove fitting.
-
Mark the carving zone on the stick.
-
Cut away from the body, always.
-
Refine and sand.
Accessibility: Requires strong fine-motor control and hand strength. Not appropriate for participants who can't maintain a consistent grip. Offer a sanding-only role for anyone who wants to participate without cutting.
Alcohol-friendly: No. This is the one craft to exclude entirely from any program where alcohol is being served. Blades and impaired judgment don't mix — full stop.
Cleanup & storage SOP: Count knives in and out — a missing blade stops the session until it's found. Sharpen, oil, and lock knives away after every use. Sweep shavings from the floor immediately (slip hazard).
Marketing blurb: Learn safe whittling technique and carve a custom grip into your own walking stick. Focused, hands-on, and deeply satisfying — sober sessions only.
11. Herb salt & infused-oil jars
Objective: A jar of herb-infused salt or oil to take home.
Audience & size: 10–30 — fast and low-skill.
Materials + unit cost:
-
Small jars — ~$1.25
-
Coarse salt + dried herbs — ~$2
-
Oil (for oil version) — ~$2
-
Labels — ~$0.25
Prep checklist: For oil infusions, use dried herbs only — fresh herbs in oil carry a real botulism risk. This is a food-safety line you don't cross regardless of how rustic the aesthetic looks. Sanitize all jars before the session.
Session length: 45 min.
Staffing: 1 lead + 1 floater per 15.
Steps:
-
Choose an herb blend.
-
Layer salt and herbs (or fill with oil and dried herbs).
-
Seal and label with contents and date.
-
Note shelf life on the label.
Accessibility: Fully seated and inclusive. Pre-open jars for anyone with grip issues.
Alcohol-friendly: Yes.
Cleanup & storage SOP: Store bulk herbs sealed and dry between sessions. Log any leftover oil — it goes rancid and shouldn't carry over to the next session unchecked.
Marketing blurb: Blend your own herb salt or infused oil to bring the flavors of the season home. Quick, aromatic, and kitchen-ready.
12. Group mural on reclaimed wood
Objective: A collaborative painted mural the whole group creates together.
Audience & size: 15–40 — best used as a big-group closer.
Materials + unit cost:
-
Reclaimed plywood/pallets — often free or ~$2/person
-
Exterior acrylics — ~$1.50/person
-
Brushes, painters tape — ~$0.50
Prep checklist: Prime the wood a day ahead. Sketch a loose grid or theme before the session — 40 people without direction collide creatively in ways that aren't fun. Tarp the entire zone, not just the center.
Session length: 2 hours. People naturally drift in and out, and that's fine for this format.
Staffing: 1 lead + 2 floaters per 20. The lead's main job is keeping the composition coherent as more people add to it.
Steps:
-
Present the theme and section the board.
-
Assign or let people claim sections.
-
Paint.
-
Sign it — the mural often becomes permanent camp decor.
Accessibility: Very inclusive. Offer low sections for seated participants and long-handle brushes for anyone who needs them.
Alcohol-friendly: Yes — works particularly well with a social atmosphere already in the room.
Cleanup & storage SOP: Seal brushes in bags if reusing same-day. Store the finished mural flat until fully cured before hanging. Tarps fold and reuse across multiple sessions.
Marketing blurb: Grab a brush and add your mark to a collaborative mural that lives on at camp long after you leave. No skill needed — just show up and paint.
When adult craft programming actually makes sense (and when it doesn't)
Adult craft programming earns its place when you're selling an experience, not just filling a schedule gap. The distinction matters more than most directors realize until they've run both and compared the feedback.
When it makes sense: Retreats and adult sessions where the experience itself is the product. Crafts with a take-home item consistently outperform activities that end when the session does. If you're building a program portfolio and pricing it as premium, hands-on workshops justify higher rates the same way a good meal plan does — worth cross-referencing your seasonal program portfolio and pricing playbook when you're deciding what to charge.
When it's a bad idea: Don't program resin, candle pouring, or whittling for large drop-in crowds with no fixed roster. These need controlled numbers and close supervision. Cramming 35 people into a resin session with two staff is how you end up with botched pieces, wasted materials, and at least one skin exposure incident.
Who should NOT run these: A single facilitator trying to cover 25 adults on a knife or hot-wax craft. If you can't hit the staffing ratio in the plan, swap to a lower-risk workshop rather than stretching coverage thin. The ratios above aren't padding — they're the line between a smooth session and an incident report.
When the programming is right but the operational setup isn't, things break in ways that are entirely preventable. Getting the craft choice right is only half the job.
Budget per-craft calculator
Use this formula for every workshop before you commit to it:
Per-session cost = (unit cost × participants) + (amortized tool cost) + (staff hours × wage)
Where amortized tool cost = total reusable tool spend ÷ expected number of sessions over the tools' life.
A realistic example: Say you run macramé for 16 people.
-
Consumables
16 × $3.50 ≈ $56
-
Reusable scissors/racks
you spent about $120, expect ~30 sessions → ~$4/session
-
Staff
3 people × 1.5 hrs × ~$16/hr ≈ $72
Total ≈ $132 for the session, or roughly $8.25 per participant all-in. If you're pricing the evening at $25–35 a head, the margin is comfortable — and that's before the goodwill of a take-home item.
Run this for every craft. The ones that look cheap on materials (whittling at ~$3) often cost the most overall because of the tight staffing ratio.
Procurement template (copy into a spreadsheet)
Copy this table into your procurement spreadsheet to standardize ordering and reorder points.
| Field | Example entry |
|---|---|
| Craft name | Candle pouring |
| Item | Soy wax flakes |
| Supplier | (vendor) |
| Unit size | 10 lb bag |
| Unit cost | $28 |
| Qty needed (per 20) | 5 lb |
| Cost per participant | ~$1.20 |
| Reusable? | No |
| Reorder point | 2 bags |
| Lead time | 5–7 days |
Two habits save the most money here: setting a reorder point so you're not panic-buying at retail mid-season, and tracking lead time so a two-week shipping delay doesn't kill a scheduled workshop. If you already run a broader consumables system, fold craft supplies into it rather than maintaining a separate inventory island.
Printable materials sign-off & inventory sheet
Hand this to whoever staffs your camp store. The goal is that tools get counted in and out of every session — because the crafts that lose the most inventory (metal stamps, carving knives, scissors, jump rings) are also the most expensive to replace.
Session: Date: Facilitator:
| Item | Type (tool/consumable) | Qty issued | Qty returned | Condition | Notes |
|---|---|---|---|---|---|
| Leather stamp set | Tool | ||||
| Mallets | Tool | ||||
| Carving knives | Tool | ||||
| Scissors | Tool | ||||
| Metal stamps | Tool | ||||
| Resin (mixed cups) | Consumable | ||||
| Wax portions | Consumable |
Sign-off: Issued by: _ Returned by: _ Discrepancies logged: ☐ Yes ☐ No
The most common failure in craft-store operations is tools leaving in someone's tote bag and not coming back — usually the sharps and the stamp sets. A hard count at return closes that gap. It's the same discipline you'd apply to any high-turnover camp asset; the same thinking behind a solid bedding and mattress procurement SOP applies equally to a $40 stamp set that quietly disappears three at a time.
A quick real scenario
A small overnight retreat center running weekend adult programs had been offering the same tie-dye and friendship-bracelet block for two seasons. Attendance for the craft slot hovered around half-full, and feedback was politely lukewarm — adults kept saying it felt "for kids."
They swapped in a rotation of four workshops from this list: candle pouring, block-printed towels, resin coasters, and the group mural as a Saturday-night closer. The sessions were priced as an optional $30 add-on rather than bundled in for free.
Two changes made the real difference. First, the take-home item raised perceived value enough that the add-on sold to roughly two-thirds of guests instead of being ignored. Second, tightening staffing on the resin and candle sessions cut wasted materials noticeably — before, they were discarding a chunk of miscured resin every weekend from unsupervised over-pouring.
The net effect wasn't dramatic on paper — a modest bump in per-guest revenue and a meaningful drop in wasted supplies — but the qualitative shift was obvious: guests started mentioning the crafts in reviews, which had never happened with the old programming block.
Final thought
The difference between adult craft programming that works and programming that limps along usually isn't the craft itself — it's the operational details around it. Right staffing ratio, pre-measured materials, a real cleanup SOP, and a count sheet that keeps your tools from walking off. Get those right and almost any of these 12 workshops will land well.
If you're refreshing your schedule, don't over-engineer it. Pick three or four crafts across different mess levels, run them clean, and let the take-home items do your marketing. And when you're setting prices, remember that a hands-on experience with something to bring home commands more than a passive activity — worth keeping in mind alongside your broader thinking on pricing and cancellation tactics during softer booking periods.
The difference between adult craft programming that works and programming that limps along usually isn't the craft itself — it's the operational details around it. Right staffing ratio, pre-measured materials, a real cleanup SOP, and a count sheet that keeps your tools from walking off. Get those right and almost any of these 12 workshops will land well.
Ready to elevate your camp management?
Join 500+ camps using Campyly to save administrative time, enhance camper experiences, and streamline daily operations.